Showing posts with label goodwill. Show all posts

Wednesday, October 19, 2011

bedroom tweaks.

It's the little things in life that make me so, so, so happy. Like new curtains. And curtain rods. And a new dust ruffle! Here are some pictures of my bedroom showing off these new little details (all from Ikea) that make me adore this space even more. 

I got two new curtain rods from Ikea for the living room, moving the more delicate (read: flimsy) ones in the bedroom. I already had a set of these HENNY RAND curtains (previously in the living room) so I picked up another pair along with a more tailored dust ruffle to complete the look. I still need to hem the second pair but I'm happy with the outcome so far. Per usual, I took these at night so please excuse the darkness.
[balance a bright, busy pattern with more neutral geometric
ones to keep the bedroom feeling tranquil]

[layer different textures like velvet, fur and microfiber to
add depth and richness to a bed set]

[experiment with unconventional headboard displays or not having one at all]

[mix clunky, chunky furniture with more sleek and delicate accessories to
keep the space feeling balanced]

[opt for a more modern photo arrangement featuring family, friends and travel highlights]
[ground the bed with a bench, trunk or small chesterfield depending on its position in the space]

[incorporate bright pops of color to keep the space feeling modern]
[choose dressing furniture vs. accessories in accent colors]

[choose tailored bed accessories to keep the space stream lined and sleek looking]

[be conscious of texture when pairing accessories for display]
[layer ceramic with pattern and/or rougher materials to create a complete look]

[choose curtains that help frame wall displays and compliment vs. overpowering them]

[soo proud of my thrift store finds: shelves from ebay, plate from goodwill
nightstand from craigslist, lamp from vintage market and thrift]

[an off-centered pillow arrangement allows for a more relaxed feel]

[good organization framed by a large photograph help create an accessories area]

[continue the color scheme and mix of patterns throughout the entire space]


[some extra photos of ruby so she could feel included]

Wednesday, October 12, 2011

the little bathroom that could: revamp

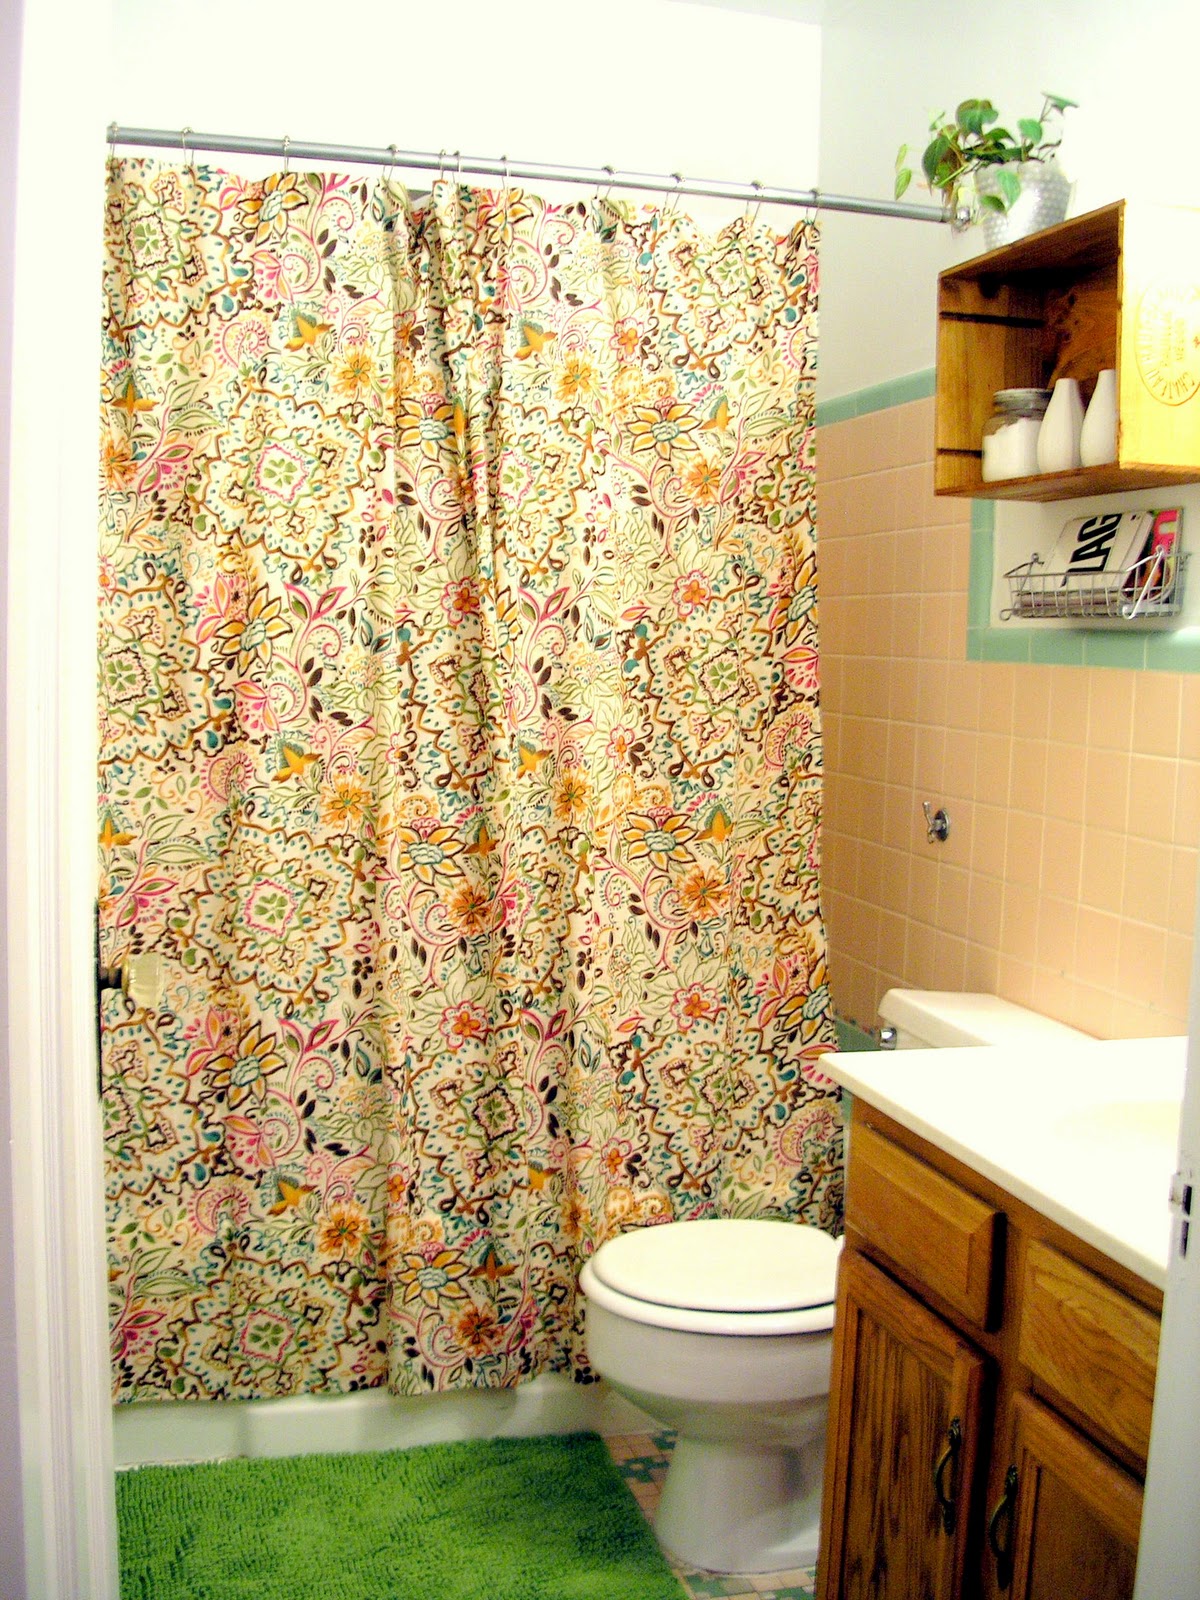
Oh, my bathroom. The little, narrow, poorly designed place I absolutely hate but secretly love all at the same time. Word from the wise: light pink + sage green = absolutely hideous.

At first I thought the best plan of attack was to temper the horrendous color palette with white. The more white the better. White rug, white shower curtain, white, white, white.

Then I came to the realization that I had a dog, with black hair, that liked to shed, shed, shed. Paired with the fact that the space ended up looking more washed out than crispy clean, out went that idea and I was on to something else.


To work with the colors, I ended up pretending the choices were good ones by focusing on the hue vs. the actual shade. I added brighter, saturated, more modern versions of the pink and green, making the space feel warm, cozy and almost fresh. Slowly but surely, the tile started to look more like a plan and less like an eye sore. And with the final additions of busy pattern and lumpy fabric, I think I might just like being in there.

Except when my stomach hurts.

Then it's always bad.


Here are some beautifully photographed afters (thank you, Centsational Girl) to feast your eyes on. Yes, it's definitely not my dream bathroom, but I think it came together as best it could in the end. Highlights include:


[pattern and texture]

[basket of reading material AKA my dad's favorite part of the space]


[refocusing the attention to brighter, prettier accessories]


shopping list:*
$21 shower curtain from Target
$5 wine crate from The Wine Merchant
$2 plant from Meijer
$3 pot from Goodwill
$13 rug from Ikea
$2 basket from Ikea

*everything else was found and collected from my own personal stash of junk treasure.

Tuesday, September 20, 2011

Must. Stop. Changing. Bedroom.

Man, bedrooms are tough. Especially when trying to stay away from that matchy-matchy bed-in-a-bag look. As it stood a few weeks ago, I made the decision to consider my bedroom complete minus a couple of big purchases I can't afford right now (hello, flat screen TV). Posted here, I thought I had nailed what should be placed above my headboard and perfected the look I was trying to hit.

And then I took another look.

I started wondering why I was so set on having a headboard.  The dark rod iron felt heavy and looked all smashed up against the corner. And, the more I thought about it, I realized that any headboard would look smashed if your bed is in a CORNER (duh).

Then I started noticing all of the square objects around the space. And suddenly grew extremely tired of chevron (it's EVERYwhere). And felt like there were enough pictures in the space (hello photo WALL).

But something still needed to be up there otherwise it looked too unfinished.

So I can up with this (hey, Ruby).


And here's the before for comparison.


See how it opens up the space and looks so much less crammed? It's simple, to-the-point and subtle. Honestly, I got really lucky with finding the accessories - the 1950's Eames-style shelves on eBay ($15) and the plate at the Goodwill on Beechmont ($3). They provide texture, balancing the busy pattern on the duvet without adding more color to the mix. Plus, I think they blend better with my wall o' frames.

 I chose to position the display off-center to avoid looking formal and making it seem more functional - almost treating the shelves like an extension of the nightstand.


You'll notice I also added two throws to create additional layers and break apart the big block of pattern. The navy adds a more masculine touch while keeping the bed grounded. I'm much happier with this end result vs. the previous one and can't wait until I save enough for a new curtains and rods.

What do you think of the change?


Friday, July 29, 2011

The cutest DIY jewelry holder. Ever.

I have been one little crafty lady these days I'lltellyouwhat. Thankfully, I've got my fellow craftastic friend, Jen, who happens to get equally excited about making random things out of even more random materials as I do. And I think this craft (aside from the farm and zoo animals made for Nora and Xavi, shown here) is probably the cutest one we've done to date. See how cute it is?


So, I'll start from the beginning.

Last weekend, Jen and I went on a thrifting extravaganza. We headed to Loveland, home of my favorite two thrift stores - Vintage Market and Thrift and Goodwill. While at Vintage Market and Thrift, we came across the most adorable porcelain candlestick holders ($8.25 for the set, btw) and then it hit me - let's make jewelry holders! Immediately, Jen was in.

After finding a multitude of little teacup saucers and another set of porcelain candlestick holders, we paid the $17 total (yes, total) and got to work on our two jewelry holders.

I know what you're thinking - you want one too, right?! Well super easy step-by-step so you can make your very own.

Step One: Scour the world for candlestick holders and plates.
The trick to choosing the right plates? Stick to one style and find a commonality. You'll notice Jen's all have a gold trim along the outer part of the plate and mine (naturally) are mostly - if not all - white.

If you are more of a modern gal, check out the sale racks at places like Pier1 or even Target.

Try and get plates that differ slightly in size, too. The larger plate at the bottom and then gradually getting smaller as you make your way up to the top. This just balances out the holder and adds another layer of consistency.

(A shot of the inspirational candlestick. And yes, that is a Smurf glass in the background)

Step Two: Get your supplies and prep for attachment.
Once you've found your materials, head to your local hardware store (mine's an Ace) and pick up some silicone glue that works on china or porcelain.

Then, thoroughly clean all your plates - getting rid of any residue - and you're ready to get started!

Step Three: Attach the plates to candlestick holders.
Start at the bottom and work your way to the top, waiting 10-15 minutes in between layers so the glue can set. We placed books and a handy-dandy Hunt's tomato can on top to apply weight and encourage fixation.


NOTE: Be sure to cap or at least cover your silicone glue top. We made the mistake of leaving the container open for a while while working on another craft project (more on that later) and the stuff started drying closed.

After all layers are glued, wait for at least an hour (or whatever the directions say) for the glue to completely dry. Then, presto! An adorable, handmade jewelry holder.


Saturday, May 7, 2011

Destination Spotlight: Vintage Market & Thrift

I've known about this prime spot for a while now and have been debating whether to share or continue keeping it my little secret. Seeing as there are only 9 of you following this blog, I figured it wouldn't hurt too much to share.

On the corner of Loveland and, well, Loveland, Vintage Market and Thrift leaves a lot to be desired outside but completely makes up for it with all of the treasures located inside. The place is loaded with tables and chairs, trinkets and glassware, sofas and dressers. The prices are reasonable and seem to be somewhat negotiable. And if that's not enough, whoever is finding the pieces for this store has a fantastic eye for design - choosing pieces with loads of potential, great lines and from various periods in time. I scored the two lamps mentioned here and am definitely continuing to go back for more.

The even better part is that all proceeds benefit charities that help families of individuals with Autism Spectrum Disorder. Another bonus? The Loveland Goowill is right down the street.

Here are some of the highlights from a recent trip out to this great furniture spot.


Friday, May 6, 2011

Spray painting, take two.

This post is a two parter, both involving spray painting.

Part one, the lamps. I love the idea of an oversized lamp on top of a dresser and bedside table. And, of course, I love the idea of them looking eclectic but tied together in some way.


To accomplish, I found two different lamps with similar, curved bases at the local thrift store, Vintage Market and Thriftfor my bedside table and dresser. Both were a horrible brass so I wanted to spray paint the two the same color to further relate them to each other without having purchased two of the same lamp.


To do this, I covered all of the pieces and parts I didn't want to spray (including the glass portion of the one lamp). I bought a spray paint with a oil-rubbed bronze finish and sprayed evenly until completely covered. And finally, I bought some lamp shades. I chose a drum shade for the bedside one and a more triangular one for the pineapple one. Because these lamps will be positioned so close together, I wanted to again keep the shades different but chose similar colors to help pull the room together. 


Part two, the mirror. I LOVE LOVE LOVE THIS MIRROR. I wanted a more delicate, vintage look to my dresser compared to what the current boxy, plain mirror offered. While thrifting one day, I came across the amazing mirror pictured below at another local thrift store, the Hyde Park Goodwill (which is crazy because I never find anything there). I had some left over glossy white spray paint from another project which I used for the frame to brighten up the area and bring out the mirror frame's detailing even more.


I played around with the accessories but still feel like something is missing. I experimented with different sized objects and their shapes to try and find a balance and composition I liked. Still toying around with it but feel it's good enough to capture and post!
Total investment: $107 (eek!)
Lamps: $30
Bronze spray paint: $9
Mirror: $20
Lamp shades: $48 (a complete splurge but I couldn't stand it any longer)