

Friday, June 24, 2011
San Juan, Puerto Rico.
Thursday, June 23, 2011

Wednesday, June 22, 2011
Voy a Puerto Rico.
Countdown: 1 day until Puerto Rico!
I am so unbelievably excited for this upcoming trip I can't even stand it. I mean, it's to the point of not being able to concentrate on anything else but the fact that, at this time tomorrow, the boyf and I will be on a plane heading there. And even though I am crazy excited, I have (true to form) still somehow managed to procrastinate packing. I've made the list (I LOVE lists), purchased all the supplies, started laying out what seems like everything in my wardrobe, all of which have yet to make it into the suitcase.
That said, I was originally going to write about what I packed and how I was planning to style my way through Puerto Rico. But, since absolutely zero of this has been nailed down yet (and likely won't until later tonight!), I thought I'd feature some photos of Old San Juan to kickoff our upcoming departure. As you can tell, the Italianate architecture is making me drool already. Enjoy!
![]()
![]()
![]()
![]()
![]()
![]()
![]()
I am so unbelievably excited for this upcoming trip I can't even stand it. I mean, it's to the point of not being able to concentrate on anything else but the fact that, at this time tomorrow, the boyf and I will be on a plane heading there. And even though I am crazy excited, I have (true to form) still somehow managed to procrastinate packing. I've made the list (I LOVE lists), purchased all the supplies, started laying out what seems like everything in my wardrobe, all of which have yet to make it into the suitcase.
That said, I was originally going to write about what I packed and how I was planning to style my way through Puerto Rico. But, since absolutely zero of this has been nailed down yet (and likely won't until later tonight!), I thought I'd feature some photos of Old San Juan to kickoff our upcoming departure. As you can tell, the Italianate architecture is making me drool already. Enjoy!


petchie (of course there's a Starbucks)
Tuesday, June 21, 2011
I heart Emily Henderson (just like everyone else).
I'll keep this short and sweet.
Emily. Henderson.
![]()
My obsession for her design continues to grow and grow and grow. She has such a fun, eclectic style - mixing classic and contemporary design into what seems like the perfect combination. A little girlie, very fresh and always interesting, I think it's Emily's attention to detail that continues to make me drool over her finished products.
Regardless, a photoshoot stylist, host of HGTV's Secrets From a Stylist and HGTV Design Star winner, this lovely lady is one to keep your eye on. And with her designs appearing on almost all of my searches, I just had to say something. Here are some rooms to show you what I'm talking about.
![]()
![]()
![]()
![]()
![]()
![]()
![]()
Emily. Henderson.

My obsession for her design continues to grow and grow and grow. She has such a fun, eclectic style - mixing classic and contemporary design into what seems like the perfect combination. A little girlie, very fresh and always interesting, I think it's Emily's attention to detail that continues to make me drool over her finished products.
Regardless, a photoshoot stylist, host of HGTV's Secrets From a Stylist and HGTV Design Star winner, this lovely lady is one to keep your eye on. And with her designs appearing on almost all of my searches, I just had to say something. Here are some rooms to show you what I'm talking about.


the winning design (@ peninehart)

Monday, June 20, 2011
Jen and Chad's place: wall stenciling
After enjoying a nice relaxing weekend at my parent's house in Cleveland, I headed back to Cincinnati to enjoy a nerve-wracking, full-of-work night at my BFF Jen's place. A big thanks to her boyf Chad for 1) trying out the first stencil until we figured out what we could use to stand on and 2) making us pizza which was absolutely delish.
Anyway, while it took at least 3 hours to complete (minus the time it took to wait for Chad's dad to drive down the spray adhesive, oops) but I have to say - totally worth it.
Step one: the idea and color
To start off, we used Jen's wallpaper pinterest post as inspiration. While I like wallpaper, Jen and Chad are thinking of eventually putting the condo up on the market so we wanted to go with something less permanent. This way, it would be much easier for potential buyers to remove it if the style doesn't suit their taste (although I can't see why it wouldn't).
![]()
Then, we went on the hunt (as mentioned in this post) to find the perfect pillow fabric that we eventually found paint to match to. We chose a taupey-gray for the primary color and a chartreuse green for the stencil color. This color combo will add a hint of drama that has a little softer of an edge than your typical black and white. Again, I highly recommend choosing the fabrics first because, as we quickly found out, it's can be way more difficult to find a fabric you like than finding the paint to match.
Step two: buy the stencil
If you Google "wall stencil" you will get millions of search results to peruse the offerings. We wanted to keep the pattern boy-friendly and relatively simple since the rest of the room's decor was the same way. This helped balance out the room's focal point, adding interest but not taking away from the rest of the room as well. We ended up going with this pattern (also shown in another pinterest inspiration photo seen here). The stencil was a little pricey ($20 + $10 shipping and handling) but the material used for the stencil was thick, making it pretty easy to use. True to our luck, there was a smal tear in the stencil itself that we were able to tape up and fix however, we are hoping a photo of the damage can be used to get some $$ refunded.
![]()
Step three: stencil!
The included stencil how-to suggested that we place the stencil at the very top middle of the area we were planning on stenciling. As mentioned before, since this was out of arm's reach, we had Chad help (thanks Chad!) us until we could figure out a plan to let him off the hook.
After agreeing to place a blanket over the newly stained tv stand (photos to come), we soon started getting into a groove. Here's the how-to highlights:
![]()
![]()
![]()
Step five: check it off the list!
So where are we at?
To Buy
- fireplace wall stencil (purchased!)
- spray/paint for "bookshelves" (maybe already have)
- spray/paint for coffee table (painting chartruese tonight)
- plant for large pot (maybe someone will donate!)
- black frame for Cape Cod photo for travel wall
- wood planks for "bookshelves" (Chad's dad is on the project)
- long pair of curtains for sofa wall (Ikea or Ikea? Or maybe already Jen has?)
- material for fireplace hearth (still investigating options...)
- sliding glass door blinds/panels (still investigating options...)
- ADDED: fireplace shelf (investigating options...)
To Find
- 3 decorative frames for "bookshelves" (Chad's dad is on the project)
- large vases for fireplace mantle (maybe Jen already has?)
- small shelf for bar wall (TBD)
To DIY
- stain TV stand
- stencil pattern on fireplace wall
- make "bookshelves" (Chad's dad is on the project)
- spray large vases white
- spray/paint coffee table (Monday)
- stain/paint wine crates for bar wall (TBD)
- paint bar wall (TBD)
To start off, we used Jen's wallpaper pinterest post as inspiration. While I like wallpaper, Jen and Chad are thinking of eventually putting the condo up on the market so we wanted to go with something less permanent. This way, it would be much easier for potential buyers to remove it if the style doesn't suit their taste (although I can't see why it wouldn't).

If you Google "wall stencil" you will get millions of search results to peruse the offerings. We wanted to keep the pattern boy-friendly and relatively simple since the rest of the room's decor was the same way. This helped balance out the room's focal point, adding interest but not taking away from the rest of the room as well. We ended up going with this pattern (also shown in another pinterest inspiration photo seen here). The stencil was a little pricey ($20 + $10 shipping and handling) but the material used for the stencil was thick, making it pretty easy to use. True to our luck, there was a smal tear in the stencil itself that we were able to tape up and fix however, we are hoping a photo of the damage can be used to get some $$ refunded.

Step three: stencil!
The included stencil how-to suggested that we place the stencil at the very top middle of the area we were planning on stenciling. As mentioned before, since this was out of arm's reach, we had Chad help (thanks Chad!) us until we could figure out a plan to let him off the hook.
After agreeing to place a blanket over the newly stained tv stand (photos to come), we soon started getting into a groove. Here's the how-to highlights:
- Figure out which is the front and which is the back of the stencil (typically represented by numbers of letters). Then, spray adhese the back with repositionable spray adhesive. This. was. clutch. Be sure to put on a good first coat, and continue to reapply every other time you stencil.
- Place the stencil in the top middle of the wall you'll be stenciling, finishing one side and then the other. Be sure to paint over the place markers so you can line up the stencil accordingly to keep the pattern consistent. At first we used a pencil thinking we could just erase, but since the wall was dark gray (duh!) we quickly changed to painting over the marker so we could see better.
- Then, evenly coat a small foam roller with paint. Not too much, not too little (make sure you can still see the details in the foam material). You will likely need to reapply paint 2-3 times per stencil, but this will keep the paint from bleeding through, giving you a nice, crisp stencil.
- After applying an even coat, peel off the stencil from bottom to top. I'm not 100% sure, but I believe this also helps the bleeding through the stencil.
- Wipe off the back with a damp paper towel, find your place markers and repeat.


Step four: touchups and wall decor (still to do)
Never expecting to be perfect, the final step to this process is going through the wall and touching up where needed with the gray or chartreuse paint. Specific areas: the corners, edges, place markers and smudged areas. I'm guessing this won't take too long - there were only a few areas where this was the case.
Also, notice the removal of the dated mantel shelf? It's looking so much more modern already! This did however, cause us to add "searching for new fireplace shelf" to the to do list. But, like the stencil, totally worth it in the long run.
So where are we at?
To Buy
- spray/paint for "bookshelves" (maybe already have)
- spray/paint for coffee table (painting chartruese tonight)
- plant for large pot (maybe someone will donate!)
- long pair of curtains for sofa wall (Ikea or Ikea? Or maybe already Jen has?)
- material for fireplace hearth (still investigating options...)
- sliding glass door blinds/panels (still investigating options...)
- ADDED: fireplace shelf (investigating options...)
To Find
- large vases for fireplace mantle (maybe Jen already has?)
- small shelf for bar wall (TBD)
To DIY
- make "bookshelves" (Chad's dad is on the project)
- spray large vases white
- stain/paint wine crates for bar wall (TBD)
- paint bar wall (TBD)
Thursday, June 16, 2011
Inspiration from Swedish home design.
For as long as I can remember, I have been obsessed with Swedish home design. With choiceful decor, white, clean lines for everything... what's not to like? If I didn't have a dog with black fur and an equal obsession with knick knacks, I would totally have a space more closely aligned to the very distinct Swedish design aesthetic. That said, it's always a goal of mine to incorporate as much of the functional design guidelines into my home as possible. Here are some inspirational photos to show you exactly what I'm talking about.


simple seating, minimal table decor, exposed beams (@ WooVaa)

exposed structural hardware, woven seating, minimal decor (@ ArchiThings)

mixed furniture styles, texture from flooring (@ viahouse)

white-washed flooring, white fabric, reading area, texture from rugs (@ dhousedesign)

fur rug (faux I hope!), functional decor, muted pops of color (@ creative home design)


bare hanging lights, queues from nature, white wood floors, fabric-hidden storage
(both @ interior furniture decorating)

platform bed, bedroom seating, minimal decor (@ idbest)
Tuesday, June 14, 2011
Jen & Chad's place: the living room to dos.
As promised, here are a list of to-dos for Jen and Chad's living room. Organized by what needs to be bought, found and DIY-ed, this holds everything that needs to be completed for the room to be considered finished.
To Buy
- fireplace wall stencil (purchased!)
- spray/paint for "bookshelves" (maybe already have)
- spray/paint for coffee table (maybe already have)
- plant for large pot (maybe someone will donate one!)
- black frame for Cape Cod photo for travel wall
- wood planks for "bookshelves" (4 per frame - Michael's?)
- long pair of curtains for sofa wall (Ikea or Ikea? Or maybe already Jen has?)
- material for fireplace hearth (still investigating options...)
- sliding glass door blinds/panels (still investigating options...)
To Find
- 3 decorative frames for "bookshelves" (maybe Jen already has?)
- large vases for fireplace mantle (maybe Jen already has?)
- small shelf for bar wall (TBD)
To DIY
- stain TV stand (sanding complete!)
- stencil pattern on fireplace wall (tackling this Sunday)
- make "bookshelves"
- spray large vases white
- spray/paint coffee table (color: TBD)
- stain/paint wine crates for bar wall (TBD)
- paint bar wall (TBD)
You'll notice that there are some TBDs within the list. We've decided to leave these a little open-ended until we can get a better idea of how the current, planned design shapes out and what still seems to be missing in terms of balancing the space.
The questions we'll likely ask ourselves to ensure the correct balance will include:
- After the fireplace wall stencil goes up, will the other half of the room look too bare?
- Are there certain patterns or colors that only seem to be on one side of the room?
- Are the wall compositions balanced in terms of the amount of decor on them?
- Is there any additional storage that's needed for things we weren't able to find homes for?
While this post is a little dull and I won't post for each room, I wanted to enforce that this is an absolutely necessary step to complete when looking to redesign your space. It helps determine progress, stay on track and figure out a budget for the rest of the materials.
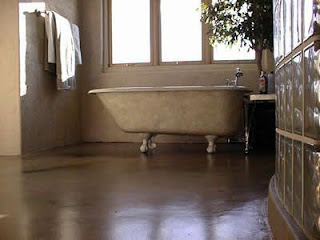
For those that are in need of some daily inspiration, check out some of these treatment options for concrete. I'm still not sold on the idea, but it never hurts to explore.


To Buy
- spray/paint for "bookshelves" (maybe already have)
- spray/paint for coffee table (maybe already have)
- plant for large pot (maybe someone will donate one!)
- black frame for Cape Cod photo for travel wall
- wood planks for "bookshelves" (4 per frame - Michael's?)
- long pair of curtains for sofa wall (Ikea or Ikea? Or maybe already Jen has?)
- material for fireplace hearth (still investigating options...)
- sliding glass door blinds/panels (still investigating options...)
To Find
- 3 decorative frames for "bookshelves" (maybe Jen already has?)
- large vases for fireplace mantle (maybe Jen already has?)
- small shelf for bar wall (TBD)
To DIY
- stain TV stand (sanding complete!)
- stencil pattern on fireplace wall (tackling this Sunday)
- make "bookshelves"
- spray large vases white
- spray/paint coffee table (color: TBD)
- stain/paint wine crates for bar wall (TBD)
- paint bar wall (TBD)
You'll notice that there are some TBDs within the list. We've decided to leave these a little open-ended until we can get a better idea of how the current, planned design shapes out and what still seems to be missing in terms of balancing the space.
The questions we'll likely ask ourselves to ensure the correct balance will include:
- After the fireplace wall stencil goes up, will the other half of the room look too bare?
- Are there certain patterns or colors that only seem to be on one side of the room?
- Are the wall compositions balanced in terms of the amount of decor on them?
- Is there any additional storage that's needed for things we weren't able to find homes for?
While this post is a little dull and I won't post for each room, I wanted to enforce that this is an absolutely necessary step to complete when looking to redesign your space. It helps determine progress, stay on track and figure out a budget for the rest of the materials.
For those that are in need of some daily inspiration, check out some of these treatment options for concrete. I'm still not sold on the idea, but it never hurts to explore.


Monday, June 13, 2011
Jen & Chad's place: the plan
Much progress was made this weekend on Jen and Chad's living room. Slowly but surely the room is coming together and what is coming together, has been totally worth the wait.
First, the sketches. Here are the simple sketches that I put together based on the back-and-forth on pinterest (listed here) and the overall needs of the space. The sketches are simple and are meant to be used as a guideline for what is needed and what the larger aspects of the decor would look like.


First, the sketches. Here are the simple sketches that I put together based on the back-and-forth on pinterest (listed here) and the overall needs of the space. The sketches are simple and are meant to be used as a guideline for what is needed and what the larger aspects of the decor would look like.

sofa wall: travel photo composition (with the ability to add), long curtains to add height, larger lamp for side table, new patterned pillows
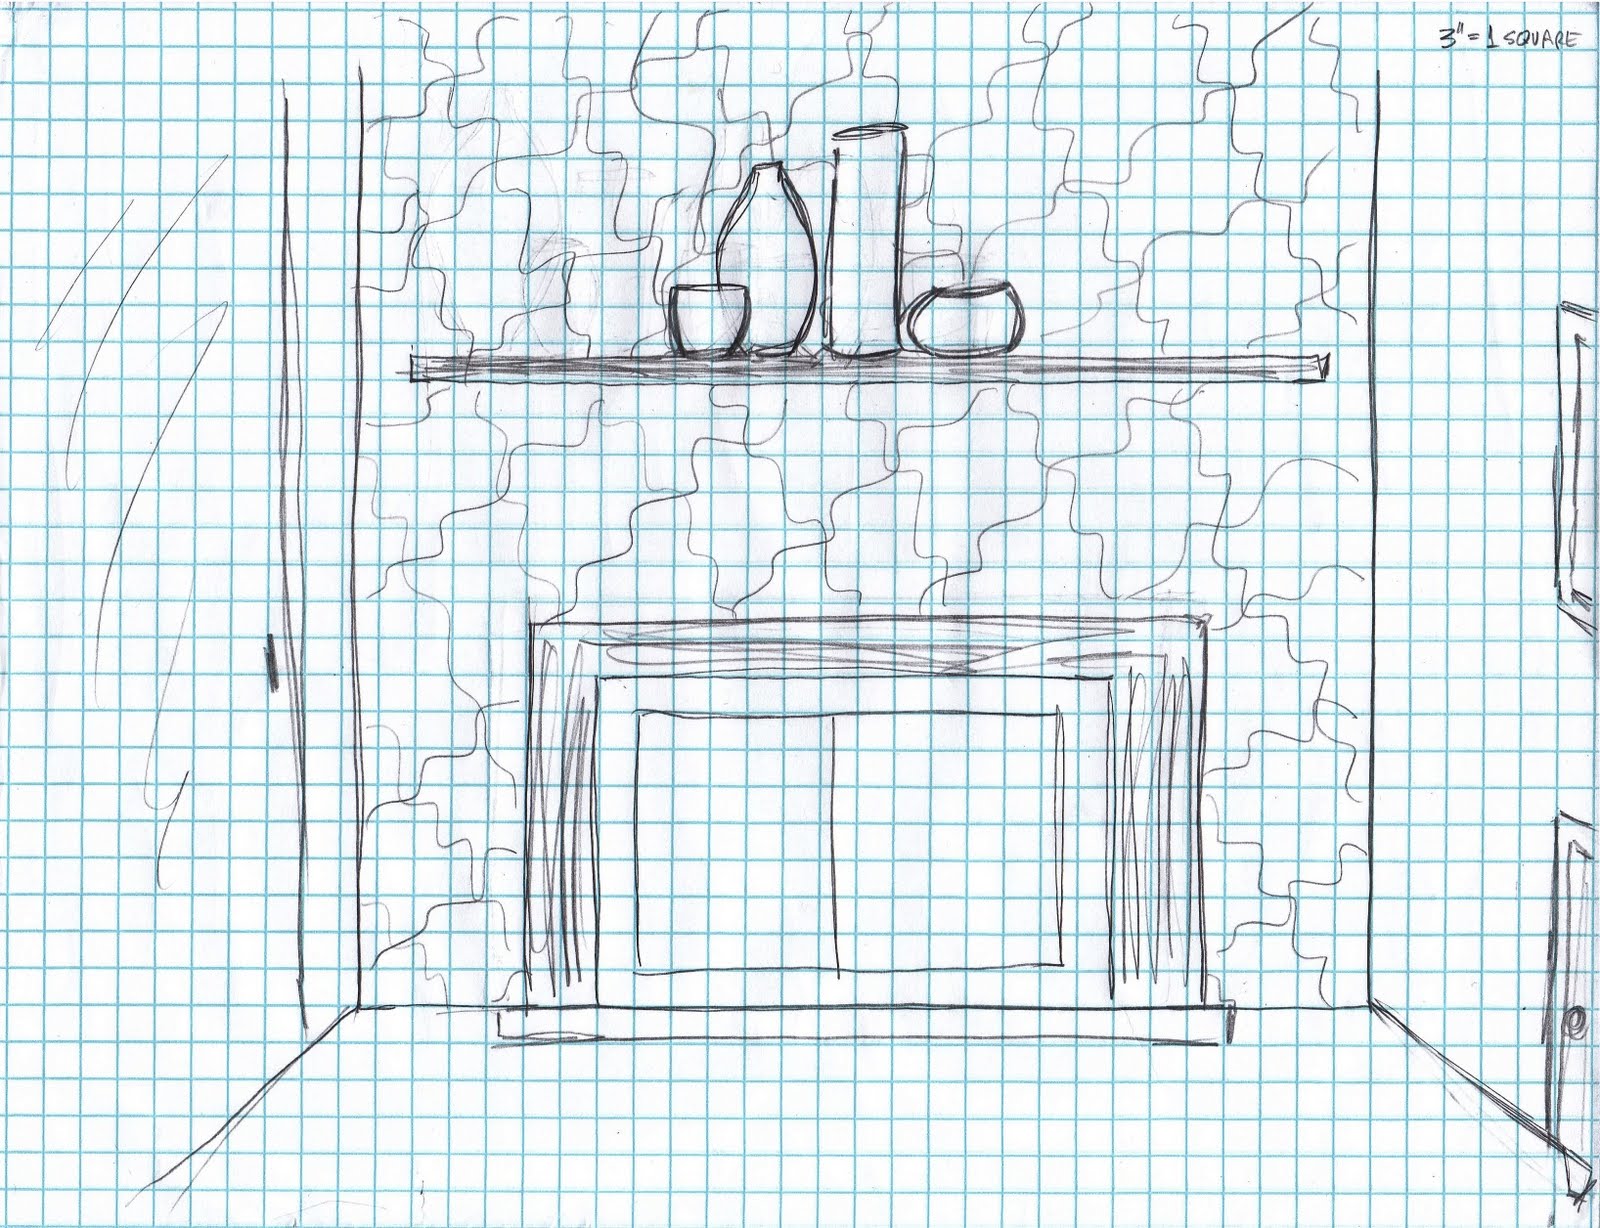
fireplace wall (main focal point): painted wall with stenciled pattern, new more modern shelf (please Chad!), very simple white vase collection

TV wall: new stained TV console, frame bookshelves (see Jen's pinterest), potted plant with stand to break up the squares

the bar wall (wild card): possible wall color, DIY shelves to house wine bottles, etc.
Second, the fabric. The reason for choosing the fabric before the paint colors is because it's more difficult to try and match a fabric with a paint color than vice versa. So, after a cool 4 hours (not exaggerating), we finally found the perfect two (yes, two) pillows that ended up being the inspiration for the rest of the color throughout the room.

Style & Co. green pillow (@ Macys)

Zenith Pillow (@ Crate and Barrel)
Once we chose the fabric, we spent a total of 20 minutes (including shake time) to pick up two gallons of paint for the fireplace wall. We went with a warm, dark gray (eagle something from Ace) for the primary color and a matching chartreuse green (lone oak something from Ace) with a lattice-like stencil.

(@ stencilease.com)
We started sanding the TV stand, painted the primary color on the fireplace wall, primed the coffee table and hung the frame composition behind the sofa. All in all, a busy weekend!
How did we put the rest together and what does the final space look like? Stay tuned!
Friday, June 10, 2011
I heart pinterest.
I am loving pinterest I'll-tell-you-what. First mentioned here, pinterest is a place to house all of the things you find save-worthy while browsing the web. Anyway, Jen and I have been using it to exchange ideas back and forth about the living room needs, wants, dreams and hopes. As referenced here, I first looked through what Jen had already posted to her pinterest board, home sweet home inspiration. Then, after checking out the accessories and pieces she already had, I tried to expand on these (and just double check I was on the same page) by creating a new board, jen and chad thoughts, allowing for additional comments and exchange of ideas. Lesson learned: this is a fantastic way to communicate and build on ideas leading up to the final plan. It helps understand someone's stylistic tendencies along with providing you with a great point of reference. Here are some highlights from the pinterest convo.
Oh, and for those dying to see the sketches (mom), you'll have to wait until next week's post. Have a great weekend!


Oh, and for those dying to see the sketches (mom), you'll have to wait until next week's post. Have a great weekend!


Thursday, June 9, 2011
Jen & Chad's place: blind fever.
With Jen's sketches (see post here) taking longer than expected, I thought I'd take this time to throw up some additional inspirational photos that I'm using for the sketches. One of the larger challenges with the space is trying to find the perfect sliding glass door treatment. The space currently has some tracked panels but they don't work very well, are a little clunky and could use a little character. Below are some options that I'm hoping will provide us with an answer. Hopefully, I'll have completed the sketching tomorrow to share with everyone!


natural woven grass for some texture

larger, patterned panels

tall, patterned drapes (not very Penny the Cat friendly)
And that's all I've found so far. Smells like a DIY project to me!
Wednesday, June 8, 2011
Jen & Chad's place: the living room prep
Let the decorating begin! Like their living room, I am just so overwhelmed with this post that I don't even know where to start. So, to help organize, I've tried to organize all of the starting points based on type.
The Floorplan
I guess we can start with the very beginning... the floorplan. Actually, the beginning would probably be a before picture but seriously, the place is filled with so much stuff right now it's not even worth it (no offense, Jen). So, back to the floorplan. The main challenge however is that this space actually includes three different functions: an entryway, a living room and a bar. However, a simple plan maximizing space and seating options was created that is pretty much the same as before Jen moved in. I mean, if it ain't broke don't fix right?

The stuff
Next comes the big stuff that is staying in the space. Overall, the only additional expenses left that Jen would like to invest in are the fireplace, sliding glass door curtains and pillow coverings. Luckily, they have so much stuff with living on their own prior to the move-in, I don't see "stuff to work with" as being an issue. Here's the colletion so far - not to say we won't manipulate it in some way (mroe to come on that in a later post).
Ikea Kramfors dark brown leather couch
the adorable buffet we found at Legacies

glass top coffee table passed on to by a friend

working fireplace with concrete hearth

mounted TV and glued-to-the-wall large mirror
The inspiration
Jen, being the creative sole that she is, developed a pinterest section specifically for housing inspiration. This gave me a fantastic starting point for building the character around the space. Here's what I took away from flipping through her "home sweet home inspiration" board.
entryway welcome
artwork above the couch,
taking advantage of the tall ceilings
white or at least very light stone on fireplace,
but only half way up if that
pattern, visual interest on the fireplace wall
interesting storage solutions
light and neutral, casual and comfy
The organization
Now it's time to go through what's in the space right now (in Jen's case... two of everything). While living rooms are often the storage area for newly moved in spaces, you have to organize, relocate and remove items you simply do not plan to use here. For the pieces (mainly accessories) where you don't quite know if they will end up living in the space, gather them all together in one section and start making decisions from there. Like I said before, I don't think accessorizing the place will be an issue.

The to do list
Lastly, we make the wonderful to-do list (what can I say, I like lists) along with a quick sketch of the different areas and how they could look. This way, flexibility is established on both ends - Jen can take charge and grab what she knows she needs (spray paint, primer, etc.), keep her eye out for what she'd like to have (pillow coverings, stencil) and have a guide for the color and style we're aiming for.
Check back tomorrow (or Friday) when I post the to-do and sketches!
Subscribe to:
Comments (Atom)